Saturday, October 20, 2018


Some notes on PBR

 
Things that can go wrong (I have done all of these):
 
Setting the trainz build at 4.5, no error, mesh will show but PBR is off, set to 4.6.
 
Typos: name.trainmesh  should be name.trainzmesh also name.m.pbrmetalmask should be name.m.pbrmetalmasked.
 
Having PBR ARN with old windows glass (nonPBR) and the numbers showed up on the glass, replacing with PBR m.glass fixed, this was in first Dev. build.
 
Getting the PBR channels in the wrong place can give all kinds of odd things, had one where as you zoomed in or paned part of the mesh would disappear, like it was cut by a knife.
 
Adding PBR to ARN is simple, you only need to add two new textures, a normal and the pbr, bouth need no data, just plane. You do have to redo the material for all the digit plans in the mesh but can use the same normal and pbr texture for all digits. The folder with the numbers is the same as before.
 
I have found that must of my content needs to have new UVmaps before up dateing to PBR. This is due to overlapping UVs. Also I find I am using lighter colors.


Friday, June 22, 2018

How to turn off ARN

 
This is how to turn off texture based ARN, that is the new TANE built in kind. This uses texture replacement and part of that is in the mesh so you can not edit or move it. You can make it not show up in game.


Above is what is in the mesh and if you do the wrong thing it can show up like this in game. So the best way is to make all the numbers be blank, this is done in the digits textures alpha channel.

You do not need to edit the config.txt.

You should find a folder with the number textures in it, default is "car_alpha_numbers" but it could be named something else. In the config.txt you will find two lines like this:

fonts                                   2
fonts-path                              "car"

The number after "fonts" is the number of fonts used, most I have ever used was 5.

The path part "car" is the first three letters of the folder you need to edit.

In the folder you will find a lot of files DO NOT RENAME them.

Sample:


What you have normally is 10 digits (0-9) and the .texture.txt to go with it. for each font, so 2 fonts 20 textures, 5 fonts 50 textures and so on. The names used if only one font have no end letter and you have 10 textures but if you have two or more there will be an end letter for each font type and will be lower case "a" for first and then "b", "c", "d" and so on.

What you need to do is edit the alpha channel of all the texture files to all black.

This is what it should look like before you edit it, make the "4" all black.

This will make the ARN transparent.


Thursday, April 26, 2018

ID maps

 
ID maps are used by Substance Painter and Quixel Suite to identify deferent materials on a mesh. Note that you can end up with some new meshes if you make the ID map wrong.
 
All an ID map is: your UVmap with parts color coded to what kind of material it should, like wood, steel, or plastic.
 
What I am doing is making the UVmap after each mesh part and group them. After that I just fill the aria with some color.
 
This is my UVmap.
 
This is the ID map, it has 5 materials.
 
Note: I am using "material" as what it is made of NOT name.m.pbrmetal witch is the name of the material used in game. You normally do not want 5 in game materials, just one if you can.
 
Here you see the two together.
 
In Substance Painter you can add a new layer for each material all on one PBRmaterial.
 
You can also make an ID map by giving each mesh part that is one kind of material a soled color material, UVmap it and the Bake the UVmap. Do this for all parts. This will give you a good IDmap but you then have to give each mesh a new single PBR material name or each color material will show as a mesh. I did this on my first try.


Wednesday, April 18, 2018

Warning for Blender FBX/PBR Exporting.

 
After three days of pulling my hear out I found and odd thing Blender was doing when exporting FBX with PBR(never had this with old .im), I was getting what looked like flipped normal but was not. This was on a bogey so I tried exporting a few parts at a time, each one worked so I was using join witch was working up to a point then it would not show in game. Got it down to two mesh's one would work the other a no show.
 
What was wrong was the UVmap. Here's what I found:

Never use this so did not see the odd thing, two UV's one UVmap and one UVtex this was the only thing I could find deferent in the two mesh's. Deleting the UVtex fixed all. Going to look up what that is for and or how it got made.

Saturday, April 7, 2018

How to setup Substance Painter for Trainz PBR.

For name.m.pbrmetal.


This should work but I have had a lot of not working exports, that is the Alpha channel would not export all the time, I think I have it now.
 
 
First thing is when you make a new project in S.P. it sets up a standard PBR materials for the Texture Set Settings. here:
 
This is wrong for Trainz, we need two more channels. So use the add "+" so it looks like this in the red box:
 
Next Trainz PBR should all be in sRGB, so they should all look like what's in the red box:
 
This is wrong but will work, leave as default.


You can now do the Bake, set up like this:
 
Now you can use S.P. to make your textures and materials. Very simple sample almost ready to export but look at the red box, three channels are set to off, they will not export.
 
To fix turn them on(blue box around them), do this for all Layers.
 
 
Now your ready to set up the exporter. I have one saved for .m.pbrmetal named Trainz and it will export three textures as PBS named skin, normal, and pbr. and I export as .tga.

The "skin" one is set up like this:

The "normal" is like this:
 
 
The "pbr" one is set up like this:
 
Update as of 5/8/2018.


Monday, April 2, 2018

UV  Maps


A 3D program uses X, Y, and Z in Units to make a mesh and paint program use X and Y as pixels, so to keep things simple 3D programs call the X and Y for pixels U and V.
 
A UV map is how the image texture is mapped to the 3D surface and there are several way to do this but they all have one problem, you can not get the surface to match up with the pixels at angles.
 
You get this:
 
 
So what happens is you get an over scan by the 3D program of the image texture. Trainz dose not use the textures you make, it re-makes them as mit-map witch also gives an over scan. What this all comes to is you have to leave a bit of room around the surface, about 1 to 3 pixels.
 
The surface part is called an island, a lot of them do look like islands on a map.


If you use a 3D paint program you can not have the islands overlap and it could give problems for PBR. Sometimes you can getaway with overlaps if it dose not show much in game, like the underside of a car body that every thing is the same color.
 
This is something I am having to do that I did not have to before. In testing with a 3D paint program overlapping is a big NO NO.
 
In Blender the best way to do the UV unwrapping is to use Smart UV Project with a 0.003 separation.
But some times you need to use the others.
 
All the islands should have about the same pixel density, that is the same scale.
 
Blender can only do a UV unwrap on one object at a time and you need to do more so there's a handy plug-in that will unwrap all selected at one time. It's here:https://github.com/ndee85/Multi-Object-UV-Editing


Monday, March 12, 2018

PBR Paint Programs

Programs that let you paint in 3D and export as PBR.
 
 
Note you can get by without one but they do speed things up and look better. I know of and have two.
 
 
Quixel Suite was the first one I got about 2 or 3 years ago before I knew about PBR. This is a plug-in for Photoshop so you have to have that for it to run. Most of my using it was with and older version and only some testing in the newest one.
 
What they have is:
 
NDO - this makes and edits Normal maps, very good at this and why I got it.
DDO - this bakes your PBR textures and others used in 3DO.
3DO - the 3D paint part.
MEGASCAN - where you can buy very large scanned images for use as backgrounds, no use for Trainz that I can see, 8k size.
 
 
The old version only worked with 3D Max 3ds files, it can now use FBX but I did an import from Blender and it did not work, gave an error and only one mesh imported. Your exported textures are all opened in Photoshop and you have to put them together as PBR.
 
I could get NDO to work but never got DDO or 3DO to work right for me and there website has problems, no images on the Doc part for some mouths now.
 
Allegorithmic makes the other one and I have had it for about two weeks and like it a lot better.
 
What they have is:
 
Substance Painter - this bakes and is a 3D painter.
Substance Designer - this makes PBR type materials.
Substance Bitmap2Material - makes a PBR material from a bitmap image.
Substance Source - where you can download PBR materials and other thing(30 per mouth).
Substance Player - where you can view and edit a BPR material.
Also the have a plugin for 3D Max and some others but not Blender.
 
You can have a free 30 trial witch is what I did then got the whole thing. In SP I imported the same FBX file that I did in DDO and it imported faster and it was all there. SP needs a good GPU I got a warning that I need to do a resedit to Win10 to run and I have a GTX 960, it was a time out setting that would stop Win10 from turning off your GPU do to high use, new setting was 60 sec.
 
Both are hard to learn as there are a lot of controls and you need to use most of them unlike Blender, Gmax, and 3D Max where you only use about 10% of them. 


Sunday, February 18, 2018

Update on PBR

 
After reading some more on PBR I found a mistake I was doing.
 
The paint textures should use RGB numbers from 30 to 240. That is RGB of (0,0,0) is no good should be (30,30,30) or (50,50,50) for dark colors. For light (255,255,255) is bad, (240,240,240) is good.
The number do not have to be the same, (30,45,76) is also good just do not go under 30. Same with light colors do not go over 240.

Note: you may need to use 255 on things like railheads, wheel treads, or other highly polished metals.
 
Why? On the dark colors you need the 0-30 for shadows and on light you need 15 for highlights.
This has been the same in Trainz form day one, a black loco using an RGB of (0,0,0) shows no detail and looks bad. For light colors I had to use RGBs of (230,230,230) for a white car to look right.
 
 
Note: I have updated to Blender 2.79 today and so far no changes needed.

Wednesday, February 14, 2018

Things to look out for in FBX


First in your config.txt the mesh should be name.trainzmesh look out for typos, .trinsmesh or .trainmesh will not work.
 
 
Remember the FBX file has your mesh in it and can be opened and used, so delete it before you make your CDP.
 
 
From Blender, check your size on export, default is like 10x bigger.
 
From Blender, check that you have Y forward and Z up.
 
From Blender, when you export to FBX everything exports, all layers, all hidden, and all cameras and lights. (This has been fixed in Blender 2.79a to work the same as XML)
 
FBX only works at trainz-build  4.5 and up.
 
PBR only works in FBX and trainz-build  4.6 and up.


Saturday, February 10, 2018


m.pbrmetalmasked
 
 
This is the same as m.pbrmetal but adds an Alpha Channel to the paint texture in slot 1.
 
This is used for making holes or hiding part or all of the mesh. This is what you use to make the mesh part for ANR, replaces m.onetex . Note there is a bug in build 91493, if you use ANR with m.onetex and use m.glass your ANR number will show up on the glass part.
 
Have used for making self-cleaning gratings.
 
Made the same as m.pbrmetal but with Alpha for transparency.
 
 
m.glass
 
 
This is used for making glass. I used it to make window glass, it has the same set up as m.pbrmetalmasked.
It uses the same 3 Textures as m.pbrmetalmasked. No idea what is deferent. For glass windows you do not need most of the data it can have, my normal and bump maps are flat.

Here are what I used:
slot1:
 
slot2:
 
slot3:
 
 
Other ones m.pbrmetaldetail and m.clutter. I have not used.
  

Friday, February 9, 2018


How to Make the Texture

in the last post


The following uses Photoshop CS6 but other paint programs should work.
 
Two things you need first:
 
1. A UV map of the mesh:
 
2. A AO map, (Ambient Occlusion) you Bake this from mesh:
 
 
I start with the UV map and the AO map open in PS. Duplicate the AO map layer to the UV map so you have two layers, close the AO map.


Note that the layer is named Background and locked.
 

Next change the Background Layer to a Channel, this unlocks it.
 
 
Now add one more Layer and move it to the bottom.
 
I have renamed the layers and made the AO one active and visible and added an Alpha Channel.
 
Next you need to get the AO map into the Blue Channel. Start with the above and go to Channels.
 
Now you fill with black, it should look like this:
 
Do the same with Green Channel.
 
Here you see the AO map is now in the Blue Channel but it should have a white background, Color Select black and fill with white.


Next set up Layers like this:

 
Then like this:

Channel like this:

Fill with white or gray:
 
 
Channels look like this.
 
Do the same with other the other Channels. Turn off the UV map or delete it.
 

Tuesday, February 6, 2018

PBR setup

Part 1

name.m.pbrmetal

 texture.005 This is all new and all just data so it will look odd.


You must use Hardness or none of it will work, do not know if Intensity worked or not.


This is the hard one to make. The RGB channel is not used as is.
 
Red Channel is Emissive this is not a light but it keeps the same color in daylight as at night.
 
Only time of day changed.


Green Channel is Roughness this is shiny or dull. Not a lot of control that I can see, more one or the other.
 
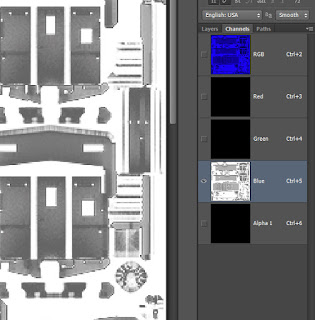
Blue Channel is your AO map.
 
Alpha Channel is Metallicity that is, is it shiny metal or not.
 
All of the wheels and axles have just one material, the wheels treads have the Green Channel set to black and Alpha Channel set to white.


Monday, February 5, 2018

PBR setup

Part 1

name.m.pbrmetal


texture.004 is the normal and bump. The normal gives an angle and the bump the displacement. The bump is in the Alpha channel and is in gray scale only.


Set to Normal in Blinder.
 
 
The RGB part is the same normal map we have been making. The Alpha channel has a new use, how high or low it should look, white is max. up and black is max. down.

To do this turn on the Alpha so it is visible and active. In the above it is not visible or active, the RGB is, you need all visible and only Alpha active, then you can paint over your normal line.

 
Here you can see only one panel line has a black line in the Alpha channel.
 

This also gives you parallax that make the flat mesh look like it had deep indent.


PBR setup

name.m.pbrmetal


This is used for painted metal, wood, or plastic. It is made up of 3 textures.


On the right you see the 3 textures named
 
texture.003
texture.004
texture.005
 
Blender makes up the names shown but you can re-name them. I think the order is important and is what 3D Max uses as slots.
 
 
texture.003 has the color and is almost the same as the old way but has no Alpha channel.


All you need to set in Blender is "Color".
 
 
This is what a RGB texture looks like as Channels.
 
to be cont.