This is the bearing plate between the car body and the Bogey, it is two plates, a male plate on the car body and the female ether on or part of the bogey bolster. This allows the bogey to turn with the track and transfer the forces to or from the powered wheels.
Making it is just a cylinder the diameter of the bolster and should go from the bogey bolster up past the body bolster so you can have a "fudge factor".
This is the first non-animated part I usually make. Remember all parts that are not animated must be "linked" to the b.r.base or b.r.main.
Sunday, March 30, 2014

Saturday, March 15, 2014
Axles
Axles are of two types, powered and un-powered. Below is the standard U.S. axle, the "D" is the most used.

To make you can use just 24 segments as you can not see axles that good. The only thing you need is "K" and "I" and "A+B" for the baring.
Powered axles are not tapered and for most Diesels you can not see the axle at all due to the motors and gearbox.
To make you can use just 24 segments as you can not see axles that good. The only thing you need is "K" and "I" and "A+B" for the baring.
Powered axles are not tapered and for most Diesels you can not see the axle at all due to the motors and gearbox.
Monday, March 10, 2014
How I make Wheels for Trainz
I like to re-use the same wheel so I made a new wheel in 2009 and have been modifying a copy ever sens. I use the "spin" method with 32 segments, if you use less the wheel will not look round. The "spin" method is just making the cross section of the wheel and spin is 32 times. Below is what I used whit Y being around 4", there is some of the image not showing where the center line is in the axle hole, I photoshoped it into a full wheel so that D was 33", I do not remember where I got this other than a website selling railroad wheel in 2009.

I detach the tread and flange then do the texturing as they have a shiny look. Then test in game, I do this a lot. Next I make a clone and flip it for the other wheel, note I do not make the two wheels into one object.
If you need an axle add it now, this can be 24 segments and will be covered later.
Next is to do the animation and test that it fits the track and that the animation is working right, this can be a nightmare.
After you have one set of two wheels working you can dup to make a 4 or 6 wheel bogey, just keep the names right.
I detach the tread and flange then do the texturing as they have a shiny look. Then test in game, I do this a lot. Next I make a clone and flip it for the other wheel, note I do not make the two wheels into one object.
If you need an axle add it now, this can be 24 segments and will be covered later.
Next is to do the animation and test that it fits the track and that the animation is working right, this can be a nightmare.
After you have one set of two wheels working you can dup to make a 4 or 6 wheel bogey, just keep the names right.
Monday, March 3, 2014
Wheels
General
Wheels are of 3 types, plate, spoke, and plate with holes.
U.S. wheel part names for a plate wheel:
Hub - the center part of the wheel where the axle hole is.
Plate - the part between the Hub and the Rim, where the spokes are on a spoke wheel.
Rim - the part that has the wheel Tread and Flange.
Tread - the part that is on the rail head.
Flange - the part that keeps the wheel from going off the track.
U.S. wheel part names for spoke and plate with holes wheel:
Same as for plate wheels but can have counterweights.
Wheels are made of ether iron or steel and are made to standards witch have changed over the years but for use in Trainz most of the changes are so small that you can not see them. An example the wheel Tread use to have a tapper of 1 in 6 and now 1 in 20, know one can see that!
If you make one good plate type wheel you can them modify it into the other two kinds witch is what I do and I do not have to do the animation part over unless it has side rods.
I use textures to show ether iron or steel wheels, iron wheels have ribs on the inside Plate. There was also a time when paper wheels where in use for passenger cars to give a better ride. The paper was compressed and had metal Rims and a flat metal plate on each side and a ring of bolts holding it on, witch is how you can spot them. I have not made this type yet but a texture should work.
Saturday, February 22, 2014
BOGEYS
Bogeys can be one of the hardest things to make due to having animation and a lack of good planes. There are a lot of tutorials on animation out there so I well be doing how real bogeys work part by part.
I well brake bogeys into freight, passenger, and powered. Trainz bogeys can also be things without wheels.
Real bogeys have to support the body and load weight, hold the wheels to the rail, and hold the brakes in place. A simple 4 wheel bogey can have over 20 parts all from deferent makers.
I well brake bogeys into freight, passenger, and powered. Trainz bogeys can also be things without wheels.
Real bogeys have to support the body and load weight, hold the wheels to the rail, and hold the brakes in place. A simple 4 wheel bogey can have over 20 parts all from deferent makers.
Friday, August 30, 2013
Auto Running Numbers
Part 4
Setting up the mesh. You need to make a square plane for each digit so if you have a 6 digit running number you need 24 planes. I start with one, make it just a little bit bigger than the number on the skin texture, make 5 copy, and then add the 6 textures(digit_1.tga to digit_6.tga). The UVmap is done by the "from view" option. This should look like the photo in the last post. Note that there is a gap between the squares. After you get a set of 6 made you can copy, move, and size for the other side and the ends.
If you need less than 6 digits, you can move them to a new layer. You will always need digit_6 so remove digits from the left to the right, that is digit_1 then digit_2 then digit_3 and so on.
The size of the "digit_n" should be the same as the "alphanumber_n.tga" texture, I use 16x16, 8x8 is to small and 32x32 is only good for large numbers.
Using two or more fonts.
This is done by copying and editing names and textures.First the "digit_n.tga" is renamed to "digit_na.tga" and a new copy is named "digit_nb.tga" where n is 1 to 6 only. for three fonts you would make 6 more with "digit_nc.tga". You also have to make/edit the .texture.txt files.
In use put all the "a's" as one font and all the "b's" as the other.
Note that the color of the texture is the same for "a" and "b" only the name changes. This is in the Wiki and the old CCG's.
Last is how to change the number font and color. This is the textures in the folder "car_alpha_numbers". The names are just like the "digit" names, just that "alphanumber" is used for "digit" and you must always have 10 that is "alphanumber_n.tga" where n is 0 to 9.
Color change is done by opening the "alphanumber_n.tga" in Photoshop or what ever you use and change the color but not to a solid one or you get an error from CMP. The ones I use have more than one RGB number. In Photoshop you can use a Variation tool that will change the color from say white to green and remember the RGB change so you can open the next one an apply the same change, saves a lot of time as you have to do this 10 times.
Font change is a bit harder as it is in the alpha channel so you need to know how to edit that in your pant program. If you know how you just change the font. You can some times edit just one number some times if all the other numbers are right. I do this with Arial as the "1" has a serif witch is not right most of the time and simple to fix. Keep track of the size and what the number is, in some of my first ones I had two "4"s and no "5".
Over all look at what others have done.
Monday, August 26, 2013
Auto Running Numbers
Part 3
To explain the Numberit system you have to look at how the mesh part looks, how to make them will be in part 4.
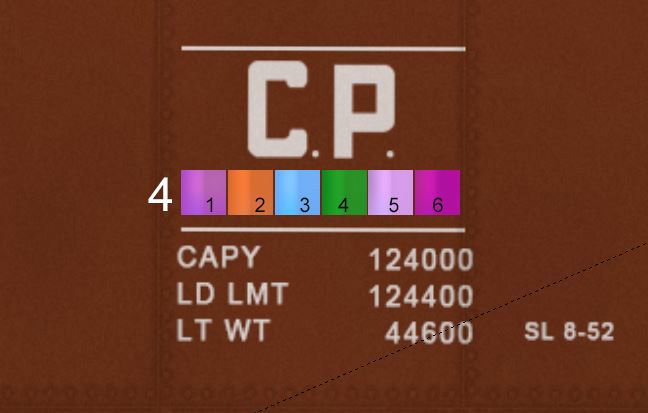
The 6 black numbered squares are the 6 meshes with the 6 digit textures. The number textures replace the digit textures in game only.
For a 6 digit number you need the "numberit_prefix" in the config, if you only need a 1, 2, or 3 digit number you can leave it out.
Set up for 6 digit number:
numberit_prefix "xxx" where the XXX can be any number but one that starts with "0"
numberit_min "ABC"
numberit_max "DEF"
The number A must be grater than D, B grater than E, and C grater than F. DEF can be as low as "000" but no higher than "888". ABC can be as high as "999" but no lower than "111". This is due to what may be a bug but if you set A and D both to "0" you do not get a "0" you louse a digit and will have a 5 digit number not a 6 digit.
Set up for 5 digit number:
numberit_prefix "xx" where the XX can be any number but one that starts with "0"
numberit_min "ABC"
numberit_max "DEF"
The number A must be grater than D, B grater than E, and C grater than F. DEF can be as low as "000" but no higher than "888". ABC can be as high as "999" but no lower than "111". This is due to what may be a bug but if you set A and D both to "0" you do not get a "0" you louse a digit and will have a 4 digit number not a 5 digit.
Set up for 4 digit number:
numberit_prefix "x" where the X can be any number but one that starts with "0"
numberit_min "ABC"
numberit_max "DEF"
The number A must be grater than D, B grater than E, and C grater than F. DEF can be as low as "000" but no higher than "888". ABC can be as high as "999" but no lower than "111". This is due to what may be a bug but if you set A and D both to "0" you do not get a "0" you louse a digit and will have a 4 digit number not a 3 digit.
Set up for 3 digit number:
numberit_min "ABC"
numberit_max "DEF"
The number A must be grater than D, B grater than E, and C grater than F. DEF can be as low as "000" but no higher than "888". ABC can be as high as "999" but no lower than "111". This is due to what may be a bug but if you set A and D both to "0" you do not get a "0" you louse a digit and will have a 3 digit number not a 2 digit.
Set up for 2 digit number:
numberit_min "AB"
numberit_max "DE"
The number A must be grater than D and B grater than E. DE can be as low as "00" but no higher than "88". AB can be as high as "99" but no lower than "11". This is due to what may be a bug but if you set A and D both to "0" you do not get a "0" you louse a digit and will have a 2 digit number not a 2 digit.
Set up for 1 digit number:
numberit_min "A"
numberit_max "D"
The number A must be grater than D. D can be as low as "1" but no higher than "8". A can be as high as "9" but no lower than "2". This is due to what may be a bug but if you set A and D both to "0" you do not get a "0" you louse a digit and will not have a number.
If you need an extra digit just put one in as you do lettering. This can come up with some low number of cars say the car numbers are 456000 to 456029 you would have to add in the "4" set the numberit_prefix to "560", the numberit_min to "00", and set numberit_max to "29".
Subscribe to:
Posts (Atom)